Ever since she saw Frozen at the cinema, Bunny has been making capes from just about anything she can get her hands on – towels, scarves, blankets – to be like Elsa, the Snow Queen.

When the World Book Day theme letter came home with the option to dress as a character from a traditional story, with Cinderella and Snow White given as examples, I knew that we’d be looking for an Elsa outfit. After all, Bunny would probably refuse to go into school if she turned up as something other than a Disney princess and saw all her friends as them. So the challenge to find one began. Not helped by her seeing a friend’s perfect example of the Elsa outfit, cape included, that had sold out months before.

So we reached a compromise. I would buy a different version of the dress and then we’d make a cape together. I had a week to do it. And I don’t do sewing. So this is what we did to make a no sew Princess Elsa cape.
First of all, I gathered the materials I’d need:

I started by cutting the fabric to size by holding it against Bunny’s back and making sure it didn’t drag on the floor. I sealed the fraying seams using a lighter along the edge.
Then I started glueing. I folded and pinned the top seam down and used glue to stick it in place. I wasn’t convinced by the glue as it just seemed to go right through the material to the table but once dry, it proved me wrong and was stuck fast.

Next, I cut some elastic, long enough to slightly gather the top of the cape so that it wrapped snuggly around Bunny’s shoulders.I used a safety pin on one end to help thread it through the hemmed seam and then held the other end in place by folding it over, pinning in place and slathering with glue. I repeated this on the opposite end and hung it to dry.

Once dried, I removed the pins and cut a couple of lengths of the hooks side of the Velcro and used the sticky backing to fix in place at shoulder level on the cape.
And now the fun could begin.
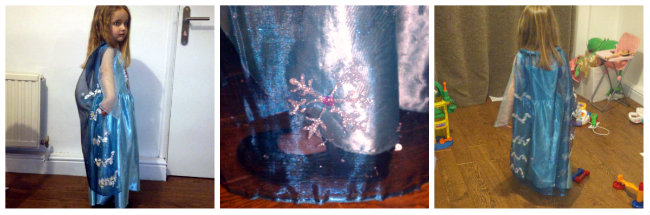
Bunny wanted a zig zag pattern so I used the glue to create it and then Bunny and Bear sprinkled (lots) of sequins onto it. We repeated this on the opposite side and then hung it to dry again.

And then the final touch. I used the blue and silver glitter pens to draw snowflakes on the bottom of the cape and stuck sequins in the middle of each. Then hung it to dry again.
However, the first time we tried it on, lots of the sequins fell off, so I covered them in glue again and stuck more on top. And yep. Hung it up to dry again.
Finally, finally, it was done. And she loved it. Phew! I was going to stick the loops side of the Velcro on the shoulders of her Elsa dress, but luckily the hooks fasten to the material without needing to.
And there we have it. A cape to complement the Elsa dress that is totally unique and to Bunny’s specification. And only cost £10 (and that’s with enough materials leftover to make another one for her sister – of course!).